Creating a New Azimap Layer With no Data to Import
If you have no data to
import, don’t worry. This guide will
take you through the steps to take to successfully create a new layer, to add
to a new map or save for another time. It’ll set you up to be able to place
your data directly onto your map when the time comes.
Contents
1.
Getting
started
2. Entering layer details
3.
Adding
attributes
3.1 What’s an attribute?
3.2 Adding an attribute
3.3 Deciding your attribute type
3.4 Saving your attribute
4.
Save your
layer
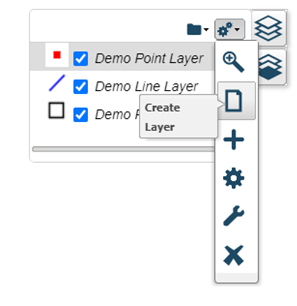
1. Getting started
To get started select the CREATE DATASET button either on the Data Catalog or on your map in the layer TREEVIEW
ADMIN button
Select CREATE OR CONNECT NEW DATASETS WITH AZIMAP on the first stage of the wizard..
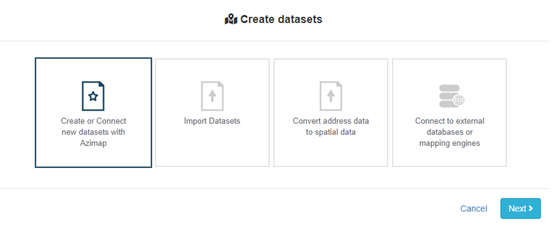
At the next stage of the wizard, select the AZIMAP dataset to create/add.

2.
Entering layer details
This pop-up will appear after you’ve
created your new layer.
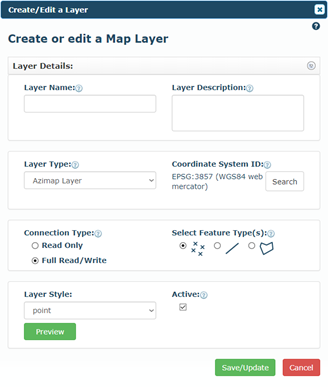
Here are some tips for editing your layer
details:
Layer Name – This field is alphanumeric only and must start with a letter
Layer Description – An optional description of the layer if required
Layer Type – You’ll likely need to choose the Azimap Layer, unless you
have advanced GIS knowledge
Coordinate System ID - Projection system of the data (defaults to web Mercator ESPG:3857)
Map
Display Projection/ESPG - the projection
for your new Map is by default set to ESPG:3857.
To change the projection, click on the search button and type in the name
of your desired projection. This will generate a list of projections with
similar names. To confirm the change, simply click on the name of your
chosen projection. N.B. Please choose your Map
Projection carefully as this cannot be changed once your Map has
been created.
Read this guide for help on choosing the correct ESPG/Map Projection.
Connection Type – Use this option to select
the access type this datastore has on the database.
Read Only - User can't add or delete
attributes from table
Full Read/Write - Allows user to add or delete
attributes to table
Only the creator of this layer can modify
connection type.
Select Feature Type - Point, Line or Polygon
·
Point – Choose this option if you want your data represented as a single point
on a map, e.g. no. of new cars by location.
·
Line – Line data is used to represent linear features such as rivers,
trails, or streets.
·
Polygon – Polygons are used to represent boundaries, for example cities or
counties.
Layer Style - Default styling for the layer, this is styling applied to the
layer when added to a map. It can be easily configured on a map by map
basis.
Active - Tick this to activate the layer.
The layer cannot be added to existing
maps until this is checked.
Complete you desired details and
click SAVE.
3.
Adding attributes
After saving the layer you will be able
to add attributes if desired. By
default, all layers created will have an Azi_ID field and a geometry.
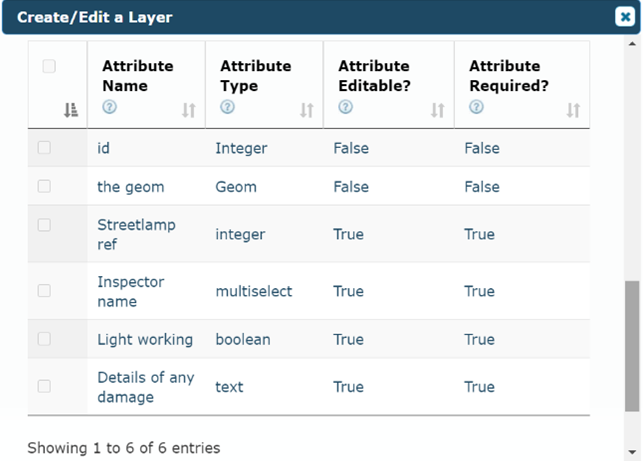
3.1 What’s an attribute?
Attributes are basically fields of data that you’ll be recording;
and adding attributes will allow you to insert all your data straight onto your
map. For example, let’s say you want to map a streetlamp inspection in your
council area. Your attributes might be:
·
Streetlamp reference/number
·
Inspector name
·
Light working?
·
Details of any damage
3.2
Adding an attribute
If you want to add another attribute,
click the ADD ATTRIBUTE button. Give your attribute a new name (it
must start with a letter).
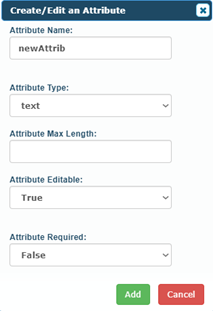
3.3
Deciding your
attribute type
Available data types for columns are:
·
Boolean - true/ false
·
Date - date/ date and time values
·
Integer - whole numbers
·
Multiselect – you can create a set of pre-defined answers for user to choose from
·
Real - decimal numbers
·
Text – A field for varying characters and length
3.4
Saving your attribute
Click ADD
Any attribute can be edited or deleted
(excluding required columns, ID and THE_GEOM)
4.
Save your layer
Click VIEW ON MAP button
to create a new map and add the layer to it. Otherwise close the window and
your new layer is available in the rest of the application.
If you haven't signed up yet go to the Azimap website and
click REGISTER.